How to use SMTP-based Event Triggering in Shinobi
With Drop-In Events you can take stress off your NVR and get more accurate Motion Detection. This is the SMTP way.
For this article we will assume your Shinobi installation is found in the default directory, /home/Shinobi.
What is SMTP
SMTP spells out and directs how your email moves from one computer to another.
How does it apply to Triggering an Event?
Many IP cameras come with a built-in Motion Detector and E-Mail client. When motion is detected the camera can send an email through your specified SMTP server.
Shinobi can now create an SMTP server for this purpose. When Shinobi receives an "email" it will see it as a reason to trigger an event, just like how it would trigger if Shinobi's built-in motion detector had caught motion.
Unlike an actual SMTP server, the one running in Shinobi is only designed to take trigger requests. It will not direct any real mail.
Why do this?
- The Shinobi server isn't doing the Motion Detection processing anymore, the camera takes the load instead.
- The camera is better capable of detecting something sooner because its accessing the stream at the hardware level.
- The camera may have other hardware to make the Motion Detection even more precise than if you were to simply check for pixel changes in a video stream.
- The Motion Detection within your camera may be something you are already familiar with. You can skip learning how to use Shinobi's Motion Detection and still make use of all the Triggering options.
Enabling the SMTP server
1. Add the following option to your conf.json.
"smtpServer":true
Run these commands to do so.
cd /home/Shinobi
node tools/modifyConfiguration.js addToConfig='{"smtpServer":true}'
2. Now restart Shinobi
pm2 restart camera
Available Options
| Option | Description | Example Value |
|---|---|---|
| smtpServer | Toggle for the SMTP server. Default is false. | true |
| smtpServerPort | Specify a specific port for the SMTP server to run on. Default is 25. | 1338 |
| smtpServerSsl | An object that contains paths for a certificate and key. | {"cert":"./ssl/cert","key":"./ssl/key"} |
| smtpServerSsl.cert | Path to your SSL certificate. | ./ssl/cert |
| smtpServerSsl.key | Path to your SSL key. | ./ssl/key |
| smtpServerOptions | An object that will override options for the SMTP Server. All available options inside this object are as shown here https://nodemailer.com/extras/smtp-server/. The only options that cannot be used are the ones that require a function as a parameter (callback). Set this option as shown in the example if your SMTP Triggering is not working in the default configuration. |
{"allowInsecureAuth":true}
|
Configure Monitor Settings for SMTP Triggering
1. Open the Monitor Settings and switch to Advanced view to reveal the Global Detector Settings.
2. Within the Global Detector Settings set the following fields.
- Send Frames : No
3. For Recording when an SMTP Trigger occurs set the following options.
- Identity > Mode : Watch-Only
- Global Detector Settings > How To Record : Traditional
- Global Detector Settings > Reset Timeout on Next Event : Yes
Setting up the E-Mail Client in a Camera
For this tutorial we will use a Reolink C1 Pro
1. Open the Device Settings by clicking the gear icon in the top right.
2. Click Network then Advanced on the left and finally E-Mail at the top.
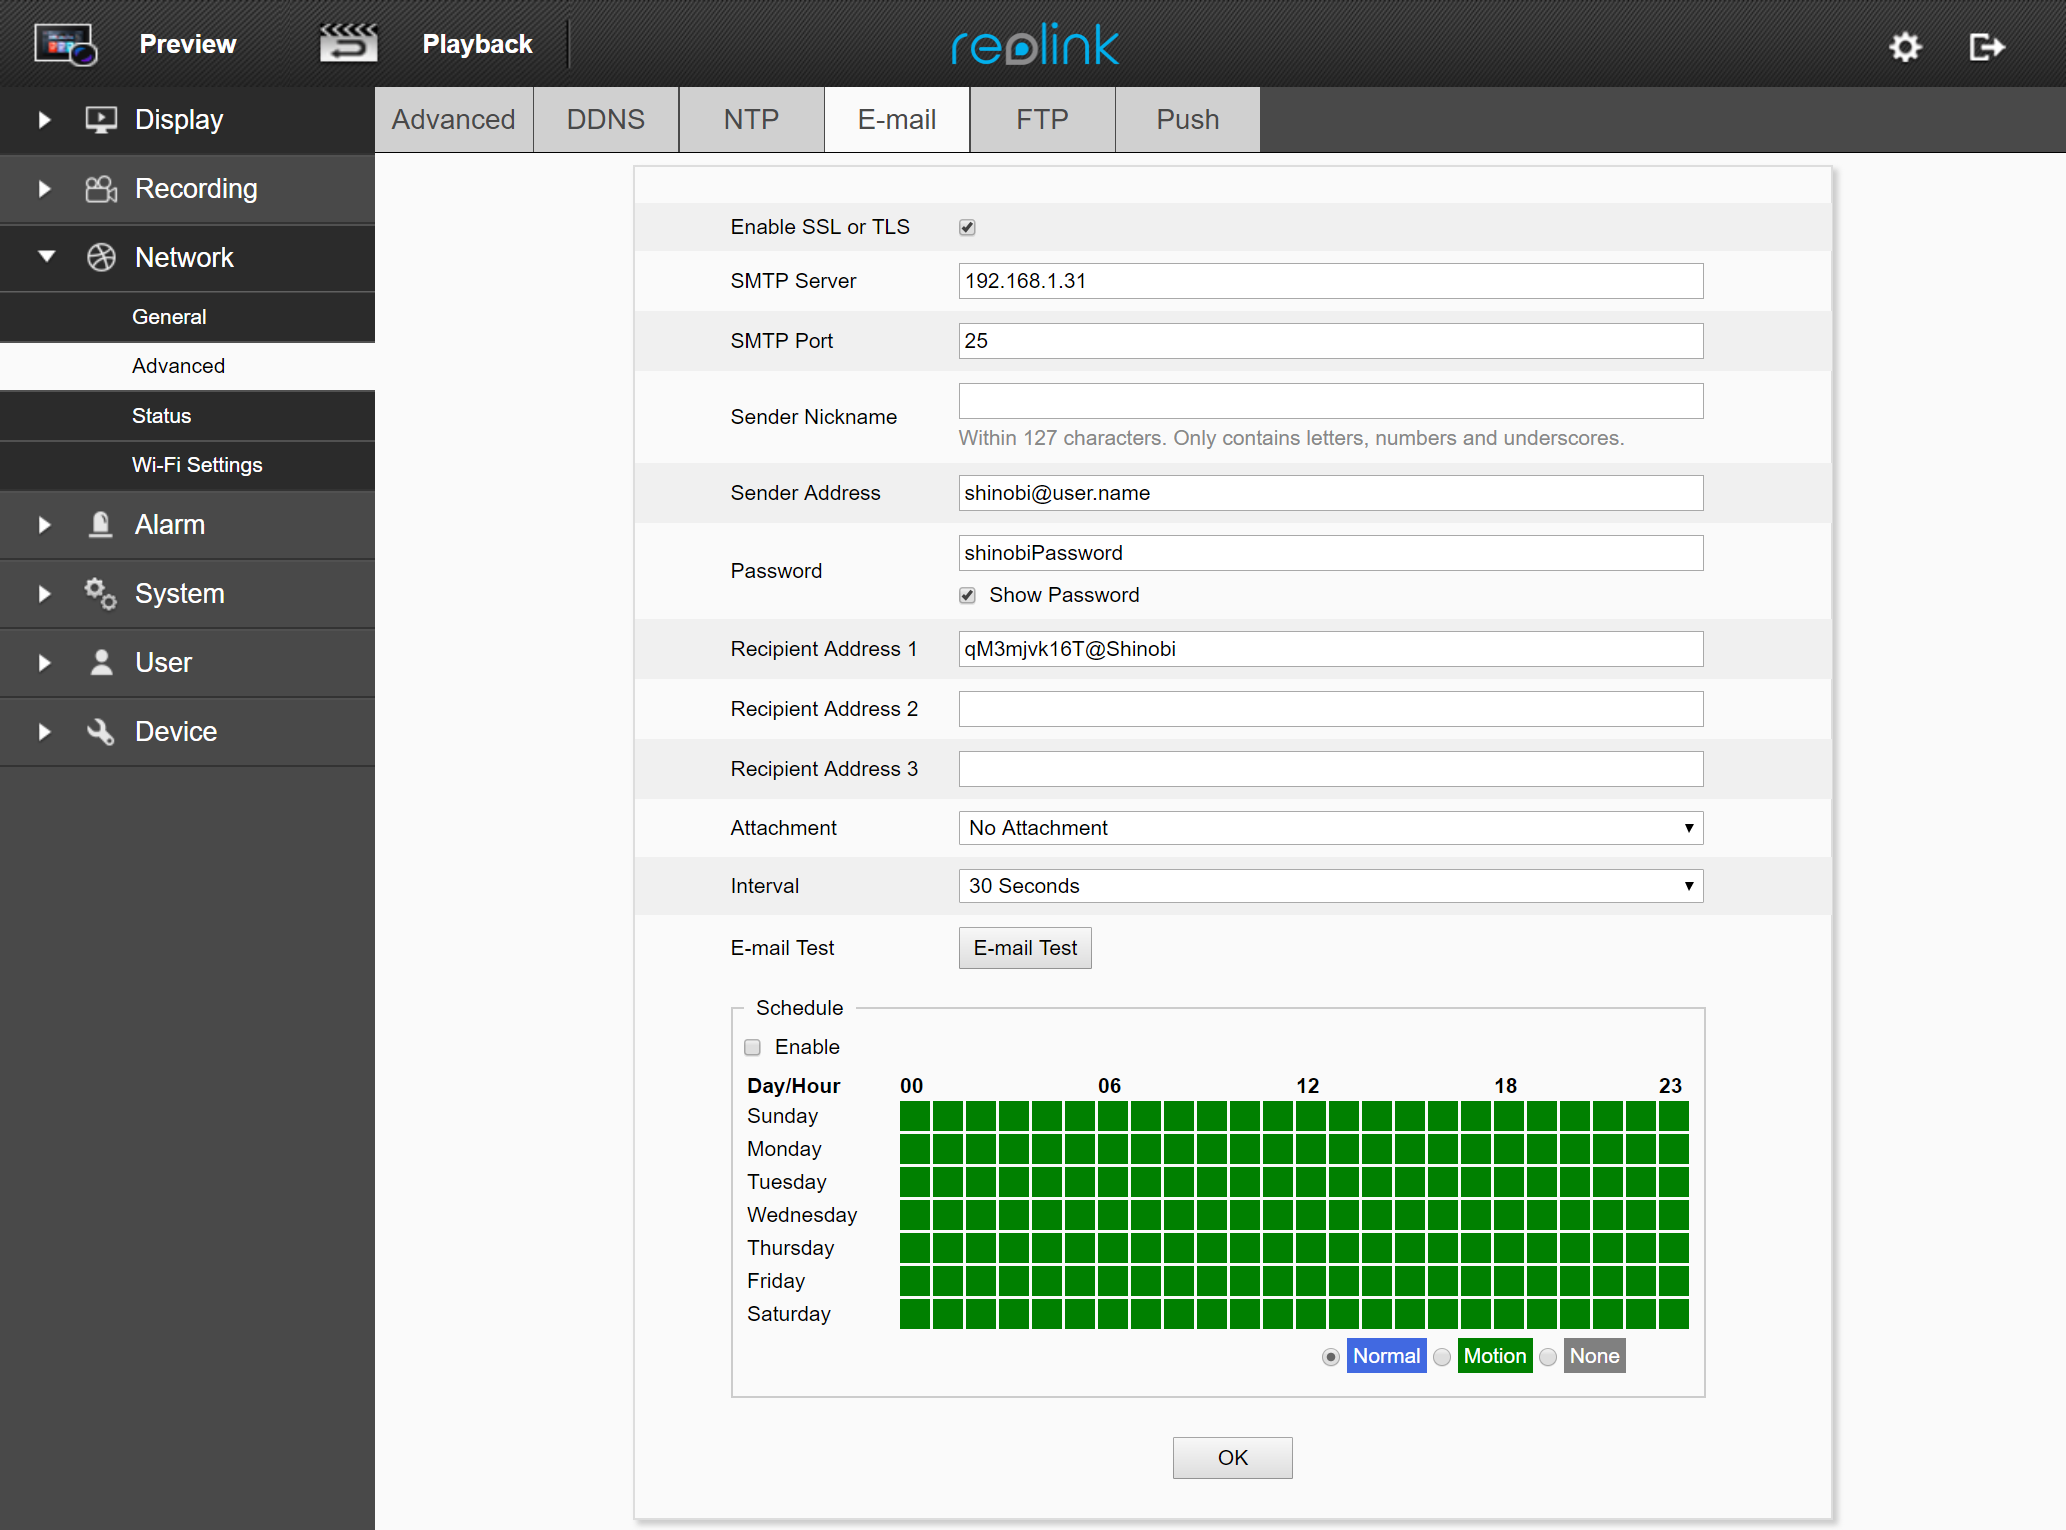
3. Set the following fields to setup the Shinobi Event Trigger.
- SMTP Server : The IP Address of the machine running Shinobi.
- SMTP Port : The Port in which the FTP Server is running, default is 25.
- Sender Address : The Username you use to login to the Shinobi dashboard. This can also be an API key. Structure must simulate an Email address, [API KEY]@Shinobi
- Password : The Password you use to login to the Shinobi dashboard. If an API key is used for the Username the Password must be the Group Key.
- Recipient Address 1 : Should be set as the Monitor ID with an @ symbol and some text to simulate an Email address. Input structure is [MONITOR ID]@Shinobi. See image above for an example.
- Additional Recipient Addresses : You can specify other Monitors to trigger from this one camera's internal detector.
- Schedule > Enable : This will toggle the E-Mail notifier.
4. Press E-Mail Test and it will trigger an event in Shinobi.
5. Save the changes.
Enjoy!